

The best way to modernise a timber-frame cottage is to preserve its charm while upgrading smartly. Start with a clear goals-and-budget plan, prioritising essential upgrades and timber-friendly fixes, with a 10–15% contingency. Assess structural health, repair only what’s needed, and preserve visible posts and joinery. Improve insulation, choose breathable, timber-compatible materials, and add energy-efficient heating, ventilation, and layered lighting. Use low-profile smart controls to balance aesthetics and performance—you’ll discover more practical strategies as you continue.
Key Takeaways
- Balance preservation with function by exposing timber features while updating layout for open, connected living spaces and clear sightlines.
- Prioritize durable, moisture-resistant exterior detailing and layered lighting to protect timber and highlight character.
- Plan with a clear budget, milestones, and contingency (10–15%) to fund essential upgrades and timber-health repairs.
- Use breathable, mineral-based insulation and energy-efficient heating (heat pumps, radiant) to modernize comfort without compromising timber.
- Integrate discreet smart controls and airtight techniques to improve ventilation, climate control, and overall performance while preserving cottage aesthetics.
Timeless Timber-Frame Charm Meets Modern Living
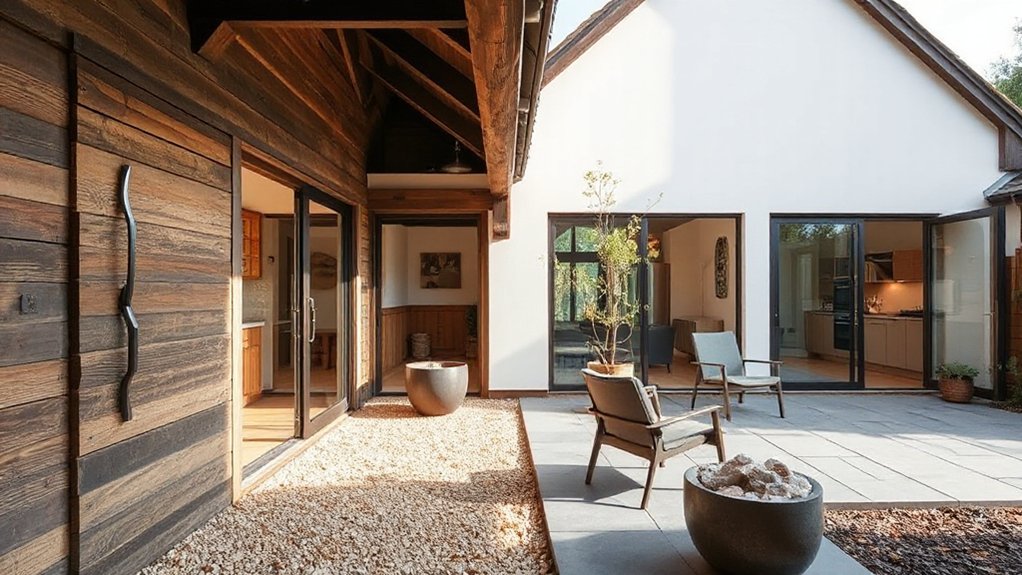
Timber-frame charm isn’t nostalgia—it’s a framework for modern living. You’ll approach your space with deliberate restraint, preserving the timber elegance while upgrading sightlines, lighting, and flow. Embrace rustic charm through honest materials: exposed beams, local timber, and textural finishes that age gracefully. Prioritize structural clarity—keep posts and joints visible, but tame them with clean paint, satin varnish, or subtle stain. For functionality, install discreet buffering zones between kitchen, dining, and living areas to maintain open sight and traffic. Introduce warm, energy-efficient lighting that highlights grain and joinery without overpowering the form. Choose furnishings that respect proportion and scale, avoiding heavy clutter. In practice, balance authenticity with utility, and your cottage gains timeless appeal with modern convenience baked in.
Set Goals and Budget for Cottage Modernization
Set clear goals for what you want to achieve with your cottage modernization, then map those outcomes to concrete, measurable milestones. Budget for upgrades upfront and build in contingencies so costs don’t derail the plan. Keep the focus on practical priorities—security, comfort, and durability—while tracking progress against your targets.
Set Clear Goals
To modernizing a timber-frame cottage effectively, start by defining clear goals and a realistic budget. You’ll map what matters most: comfort, durability, and charm, while keeping historical preservation and landscape integration in sight. Set measurable targets—timeline milestones, performance criteria, and functional priorities—so you can judge progress objectively. Prioritize essential upgrades first, then schedule enhancements that elevate living quality without overextending funds. Clarify constraints, from structural allowances to planning permissions, and build a decision process around them. Document assumptions, risks, and tradeoffs, so every choice stays accountable. Communicate goals with your team and any stakeholders, ensuring alignment and buy-in. With precise aims, you’ll navigate design options confidently and avoid scope creep later.
Budget For Upgrades
Now that you’ve set clear goals, you’ll need a practical budget to match them. Start with a baseline: list mandatory upgrades, then flag nice‑to‑haves. Prioritize structural and safety work first, followed by energy efficiency and maintenance tasks. Allocate percentages to categories: core renovations, finishes, and landscaping. Build a contingency of 10–15% for unforeseen issues, especially with timber framing. Track costs weekly and revise forecasts as quotes come in. When budgeting exterior work, factor in exterior paint quality, weather windows, and surface preparation—these affect longevity and maintenance cycles. For garden landscaping, estimate plantings, hardscaping, irrigation, and ongoing care. Secure reliable tradespeople with written quotes and timelines, then align payments to milestones. Finalize a transparent budget spreadsheet and review it quarterly to stay on track.
How to Assess Structural Health Before Upgrades
Evaluating structural health before upgrading a timber-frame cottage is essential to avoid costly surprises later. You’ll determine safe upgrade paths by checking load paths, connections, and timber condition with a methodical eye. Start with a focused assessment of foundation stability and structural frames, then plan repairs only where needed. Keep records for future projects and approvals.
- Inspect foundations for settlement, cracks, and moisture damage that could compromise loads.
- Examine timber frames for rot, insect damage, fastening integrity, and joint distress.
- Verify load-bearing elements and bracing meet current safety and design requirements, adjusting plans accordingly.
Pest inspection and foundation stability are critical anchors in your assessment, guiding sensible, durable upgrades while preserving structural health. Plan with a professional for final verification.
Insulation That Preserves Timber Character
You can reduce Timber-Frame heat loss without compromising character by choosing insulation that fits between timbers and enhances the grain, not hides it. Explore hidden insulation techniques that keep walls slim and breathable, while still meeting modern standards. Start here by balancing efficiency, timber aesthetics, and practical installation steps to preserve the cottage’s authentic feel.
Timber-Frame Heat Loss
Timber-frame homes lose heat mainly through the gaps around posts and joints, so choosing insulation that respects the frame’s character is essential. You should combine high-performance materials with breathable wraps to maintain moisture balance and avoid timber decay. Prioritize solutions that stay visible, preserve grain, and minimize disruption to structure while delivering warmth and comfort. For protection, integrate continuous insulation and sealants that complement wooden joints without crowding the aesthetic.
1) Use mineral wool or cellulose in cavities with careful detailing around posts
2) Employ breathable vapour barriers that allow timber to dry naturally
3) Choose weather-resistant claddings and edge tapes to deter pests and moisture ingress while maintaining the look
Also, plan for pest prevention and routine checks to sustain performance.
Hidden Insulation Techniques
Hidden insulation can preserve timber character while boosting warmth. You’ll install unobtrusive layers that work with existing walls, not against them. Focus on breathable, dense-pack or board-like solutions that minimize disruption to visible timbers. Choose materials that complement historic aesthetics while delivering high R-values and steady indoor humidity. You’ll integrate hidden insulation behind plaster or inside wall cavities, ensuring grills and access points remain discreet. Prioritize air-tight junctions at junctions and around penetrations to reduce drafts without compromising timber details. Pair the system with moisture barriers designed for timber frames, preventing wood decay and mold. Regular inspections help you catch moisture issues early, maintaining structural integrity while preserving the cottage’s character for years to come.
Preserving Timber Aesthetics
Preserving timber aesthetics means choosing insulation strategies that blend with the cottage’s character while delivering real warmth. You’ll want options that respect grain, joints, and original finishes, so you preserve authenticity while improving comfort.
- Timber preservation: select thin, high-performance batts or boards that fit between studs without compressing surfaces.
- Aesthetic restoration: add breathable, mineral-based insulation where possible to avoid moisture traps and preserve tone and patina.
- Hidden performance: use intumescent or reflective linings behind timber panels to reduce heat loss without altering sightlines.
Choose methods that maximize thermal efficiency while maintaining visual integrity. Prioritize materials with low environmental impact and long service life. Implement gradual upgrades, document finishes, and consult an expert if you plan to re-stain.
Heating for Comfort and Efficiency

How you heat a timber-frame cottage can make or break comfort and efficiency. To balance heritage with modern living, choose a heating system that minimizes heat loss and maximizes control. Start with good insulation, drafts sealed, and thermal bridging addressed so your retrofit gains real value. Where possible, opt for heat pumps and radiant, underfloor, or well‑placed radiators that deliver even warmth without overheating spaces. Use thermostatic controls and zoning to tailor comfort to rooms, not habits. Maintain fire-safety clearances and sustainable fuel options if you include a stove, ensuring Historical preservation is respected in placement and finish. Pair efficiency with style by selecting textures and finishes that nod to rustic decor while keeping performance high and emissions low. Regular servicing keeps systems reliable and quiet.
Run Discreet, Safe Electrical Systems
You’ll plan for safe, discreet electrical runs that keep wires hidden and accessible only to qualified hands. Prioritise safe wiring practices and tidy routing to minimize fire risk and damage to timber joints. By concealing cables thoughtfully, you improve aesthetics and reliability without sacrificing safety or future flexibility.
Safe Wiring Practices
To keep a timber-frame cottage safe and reliable, plan for discreet, up-to-date electrical systems from the start. You’ll maximize electrical safety by using quality materials, correct sizing, and professional installation practices that respect the structure. Focus on unobtrusive routing, proper weatherproofing, and accessible shutoffs to reduce risk while preserving character. Prioritise clear labeling, regular inspections, and code-compliant components to prevent faults and outages.
- Use appropriately rated circuits and outlets, with dedicated breakers where needed.
- Install tamper-resistant, weatherproof fixtures and GFCI protection in damp areas.
- Schedule periodic inspections to verify connections, insulation integrity, and overall performance.
Electrical safety hinges on disciplined wiring upgrades, meticulous workmanship, and ongoing maintenance.
Hidden Electrical Routing
Hidden electrical routing should be planned and executed with discretion, so wires stay out of sight without compromising safety or accessibility. You’ll prioritise screenings, chases, and conduit routes that respect timber framing and existing finishes. Aim for hidden wiring that serves modern needs while preserving character, using low-profile channels and surface mounted options only when concealment is impractical. Start by mapping outlets, switches, and early lighting plans to minimize retrofitting. Prefer in-wall runs within stud bays or between joists, with appropriate protection, cable ratings, and fire-stopping. Use electrical concealment techniques that blend with plaster or paneling, and document routes for future access. Regularly test systems, maintain clear access points, and avoid overloading circuits. This approach balances aesthetics with reliable, code-compliant performance.
Windows and Doors That Blend Timber With Performance
Windows and doors are the gateways between timber warmth and modern performance, so choose components that respect the cottage’s character while delivering energy efficiency, weather resistance, and low maintenance. You’ll blend timber joinery with modern seals, glazing, and hardware for enduring performance.
- Prioritize timber joinery that’s proven, with tight joints and durable finishes that resist seasonal movement.
- Opt for multi-pane window glazing with low-emissivity coatings and gas fills to boost insulation without sacrificing light.
- Select weather-tight frames and reputable hardware to guarantee long-term reliability and ease of operation.
Apply this approach to both doors and windows, balancing aesthetics with air sealing, thermal performance, and upkeep ease to preserve vintage charm while improving comfort.
Sustainable Materials That Honor the Craft
Sustainable materials aren’t just eco-friendly extras—they’re the backbone of a timber cottage that stands the test of time. You choose sources that align with durable performance, not trends, and you verify provenance, emissions, and lifecycle costs before you install. Prioritize low-toxic, low-VOC options that still meet durability needs, so you protect both occupants and the fabric of the building. Embrace timber preservation treatments that extend life while preserving aesthetic integrity, and favor responsibly harvested wood and certified hybrids where appropriate. Your aim is sustainable craftsmanship in every detail—from fasteners to finish—so the structure breathes, ages gracefully, and remains free from avoidable maintenance burdens. When you apply Eco friendly finishes, you preserve warmth and color without compromising indoor air quality or long-term habitability.
Interior Layouts for Modern Flow in a Cottage Footprint

A cottage footprint doesn’t constrain you to cramped rooms; with thoughtful layout, you can create a modern flow that feels open yet intimate. You’ll design clear sightlines, create zones for living, dining, and cooking, and keep traffic paths uncluttered for daily ease. Use a single, flexible core to connect spaces, with pocket doors or partial partitions that preserve light and warmth. Integrate garden landscaping views from key positions to extend indoors, and plan lighting that complements the footprint’s rhythm. Prioritize natural light, thermal comfort, and accessible storage.
- Align the kitchen, dining, and lounge into a single, continuous loop for effortless movement.
- Position work zones to minimize cross-traffic while maximizing view corridors.
- Integrate outdoor lighting and garden landscaping to blur indoor–outdoor boundaries.
Finishes and Textures That Echo Traditional Character
When you’re aiming to capture traditional character in a timber-frame cottage, choose finishes and textures that read as authentic yet refined. Opt for muted palettes that echo age without aging you out of modern living. Prioritize Rustic Elegance by pairing warm oak floors with plaster walls in soft, breathable tones, creating a glow that’s both tactile and reassuring. Use Natural Finishes on wood beams and cabinetry to celebrate grain, while avoiding heavy varnishes that mask depth. Textile choices should be natural and understated—linen curtains, wool rugs, and tweed upholstery that soften angles without clutter. Keep metalwork simple and purposeful: brushed brass or blackened steel hardware, minimal but expressive. Balance worn-in patina with clean lines to sustain a cohesive, timeless ambience.
Roofing and Exterior Detailing for Long-Term Durability
Roofing and exterior detailing are your front lines against weather, so plan for durability from the outset. You’ll prioritize materials and detailing that resist moisture, UV exposure, and thermal cycling, ensuring long-term performance without frequent repairs. Choose exterior materials that balance aesthetics with proven longevity, and specify sealed joints to prevent leaks. Focus on ventilation, drainage, and proper flashing to channel water away from timber frames. Use durable, low-maintenance finishes that age gracefully while protecting timber from rot and pests. Consider seamless or well-sealed roofing progressions to minimize infiltration risks. 1) Select high-quality underlayment and corrosion-resistant fasteners. 2) Implement continuous soffit, fascia, and venting for airflow. 3) Detail joints with backward-capable flashing and damp-proof barriers to extend roof durability and exterior material longevity.
Lighting to Boost Atmosphere and Efficiency

Lighting your space smartly starts with layering: combine ambient, task, and accent cues to shape depth and usability. You’ll boost efficiency with energy‑saving LEDs, dimmers, and smart controls, while perimeter lighting adds mood without glare or wasted watts. Start by mapping zones, then apply focused, warm tones to living areas and cooler, task‑oriented light where you cook or read.
Lighting Layering Techniques
Layering lighting isn’t just about brightness; it’s about shaping mood, energy use, and functionality across a timber-frame cottage. You create depth with three tiers: ambient, task, and accent. The trick is balance between vintage lighting and modern efficiency, ensuring rustic decor feels cohesive, not dated.
- Layer warm ambient fixtures to wash spaces without overpowering timber details.
- Use targeted task lights for kitchens and desks, choosing dimmable LEDs that mimic natural light.
- Add accent cues—wall sconces or uplighters—that highlight timber joints and architectural features.
Keep controls simple: a single switch for zones, plus dimmers for mood shifts. This approach preserves atmosphere while boosting energy awareness and practical usability without compromising the cottage’s character.
Energy-Efficient Illumination
Controlling energy use while maintaining a warm, inviting glow isn’t optional—it’s essential. You optimize energy-efficient illumination by choosing high‑quality LEDs with appropriate color temperature for timber-frame spaces, then layer lighting with intent. Start with recessed and task lighting for work areas, guaranteeing fixtures have dimmers to adapt mood without excess power. Use energy‑rated, airtight fixtures to reduce heat loss and stray light. Prioritize task and ambient layers over decorative bursts to minimize waste while preserving atmosphere. Smart controls help you schedule and adjust lighting based on daylight and occupancy, boosting efficiency without sacrificing comfort. In regard to garden landscaping and outdoor aesthetics, ensure exterior lights highlight architectural features while remaining shielded and low‑glare. This disciplined approach keeps your cottage bright, efficient, and inviting.
Mood-Cacing Perimeter Lighting
A well-planned perimeter creates mood and saves energy by washing the cottage with controlled, low-glare light that guides you home. Mood-enhancing perimeter lighting elevates curb appeal while keeping energy use predictable, ensuring you’re never surprised by bills or glare. Use targeted fixtures to sculpt shadows and emphasize timber details, pairing warm color temperatures with dimmable controls for fluid shifts from day to night.
- Install low-profile wall lanterns at entry points to define paths without overpowering the landscape.
- Use warm, diffused perimeter lighting to create mood lighting that feels inviting yet understated.
- Connect all fixtures to a smart system with occupancy sensing and timers for efficient, consistent illumination.
Kitchen and Bath Upgrades in Classic Style
If you’re upgrading a timber-frame cottage, start with the kitchen and bath by preserving their classic character while introducing modern, reliable systems. You’ll blend period details with updated plumbing, wiring, and efficient fixtures, ensuring quiet performance and durable finishes. Choose cabinetry that echoes traditional silhouettes—shaker or paneled fronts—paired with timeless hardware. Opt for a restrained palate: warm whites, soft creams, and natural wood tones that reflect the cottage’s heritage. In baths, prioritize water efficiency without sacrificing character: pedestal sinks, freestanding tubs, and slate or subway tile mosaics. Plan sensible layouts that improve flow, storage, and accessibility. Consider accent touches like garden pathways or outdoor sculptures visible through windows to reinforce a cohesive, lived-in charm. Finish with durable, easy-care surfaces and smart ventilation.
Preserving Beams and Plaster Harmony
Preserving beams and plaster harmony starts with evaluating where structural timbers meet wall finishes, so you can plan compatible treatments from the outset. You’ll prioritize preserving historic timber while selecting plaster textures and plastering methods that respect movement and breathability. Coordinate repairs, finishes, and insulation to maintain the cottage’s character without compromising longevity or performance.
Preserving Beams Harmony
How can you maintain the delicate balance between exposed timber and plaster when modernising a timber-frame cottage? You’ll prioritise harmony through deliberate beam detailing and thoughtful timber restoration, keeping authenticity intact while upgrading resilience. Respect proportions, avoid heavy treatments, and choose breathable finishes that allow moisture movement. Align fixings with existing timber grain and use discreet, reversible methods to protect historic integrity. Maintain contrast by choosing plaster finishes that complement, not compete with, the timber’s character. Follow these steps for a balanced result:
- Assess structural loads and run modest, reversible reinforcements for stability.
- Select finishes and sealants that breathe with the timber and plaster.
- Document each decision to preserve provenance and future alternatives.
Focus on quality over quantity to sustain the cottage’s timeless appeal.
Plaster Wall Compatibility
Plaster walls can either echo or dampen the timber’s character, so compatibility matters from the outset. You’ll want plaster compatibility that respects beam depth, curvature, and existing plaster thickness, ensuring a stable interface across historical joints. Start by evaluating material compatibility: lime plaster pairs well with timber, allows breathability, and minimises cracking compared with cement-based mixes. If you must use modern gypsum, reinforce joints with breathable membranes and compatible backing materials to avoid moisture buildup. Plan wall finishing in layers that accommodate seasonal movement, avoiding hard changeovers that stress plaster. Detail transitions around beams with respectful reveals and reins, so plaster finishes remain visually harmonious. Choose finishing techniques that balance sheen, texture, and heritage, preserving the cottage’s tactile warmth while delivering durable, low-maintenance results.
Ventilation and Moisture Control for Long-Term Care
Ventilation and moisture control are essential for the long-term health of a timber-frame cottage. You’ll protect timber integrity and indoor air quality by pairing proactive airflow with steady moisture management.
- Assess your enclosure: identify gaps, verify vapor barriers are correct, and restore airtightness without trapping humidity.
- Implement targeted ventilation strategies: use balanced and continuous supply-exhaust systems, with heat recovery where possible, to keep humidity stable.
- Monitor and adapt: install hygrometers in key rooms, track seasonal swings, and adjust exhaust and intake as conditions shift.
Maintain a routine: seal leaks, manage condensate from showers, and vent high-moisture activities outdoors. This disciplined approach minimizes mould, preserves timber, and sustains a comfortable, healthy home.
Low-Profile Smart Home Ideas for Cottages

Smart, low-profile tech can boost comfort in cottages without compromising their character. You’ll want discreet devices that blend with timber finishes and plaster, not shouty gadgets. Prioritize integration over novelty: a unified hub ties lighting, climate, and access into one pane of control. Choose devices with wireless power, local processing, and simple routines that respect passive design elements. For security, implement smart security features that monitor doors and windows without intruding on natural aesthetics, then review alerts with a calm, scheduled routine rather than real-time noise. Garden automation should enhance outdoor spaces while staying unobtrusive: consider weatherproof sensors, automatic irrigation, and subtle lighting that highlights features rather than dominates them. Maintain ease of maintenance, and guarantee updates are unobtrusive to the cottage’s atmosphere.
Real-World Case Studies: Before-and-After Timber-Frame Updates
Real-world case studies show how thoughtful timber-frame updates perform in ordinary settings, from cramped cottages to modest ranch-style footprints. You’ll see how historic restoration and timber preservation blend modern comfort with authenticity, delivering measurable improvements in energy, durability, and layout flow. To help you translate lessons into action, consider these examples:
1) Structural reinforcements integrated with original joinery without visible compromise.
2) Insulated envelopes paired with breathable inner layers for comfort and long-term preservation.
3) Updated services and light-filled spaces that respect scale and timber texture.
These cases demonstrate that disciplined planning, precise craft, and material respect yield elegant results, not flashy gimmicks. The focus stays on durable design, clean lines, and lasting value.
A Maintenance Plan to Preserve Charm for Generations
A maintenance plan for a timber-frame cottage should be practical, durable, and straightforward, because preserving charm over generations hinges on consistent upkeep. Start with a yearly timetable: inspect structural timbers for signs of moisture, insect activity, or cracking, then schedule targeted treatments if needed. Prioritize breathable finishes that protect without sealing out moisture, and document all work for future owners. Establish a seasonal routine for roof and gutter care to prevent water ingress that damages framing and plaster. Integrate timber preservation with cottage landscaping—thin, well-spaced plantings around foundations reduce moisture buildup, while strategic shading minimizes UV wear on exterior surfaces. Maintain clean, accessible crawl spaces and controlled ventilation to sustain indoor air quality and timber longevity. This plan keeps charm intact while supporting practical modern living.
Frequently Asked Questions
How Can I Spot Hidden Timber Rot Early?
You spot hidden timber rot early by checking for subtle soft spots, spongy texture, and springy boards, then confirm with probing and moisture meters. Look for timber decay signs and moisture intrusion near joints, leaks, and exterior vents.
What Are Cost-Effective Micro-Renovations That Count?
You can start with budget-friendly tweaks like upgraded interior lighting and smart dimmers, plus simple landscape integration tweaks; these micro-renovations illuminate spaces, blend indoors with outdoors, and boost vibe and value without major disruption or cost.
Which Damp-Proofing Methods Protect Plastered Walls?
To protect plastered walls, use breathable membranes and eco friendly treatments that manage moisture without trapping it. Apply a damp-proof coating only after assessment; guarantee ventilation improvements and continuous monitoring for lasting performance in damp-prone timber-frame cottages.
How to Balance Timber Aesthetics With Modern Fire Codes?
Can you balance timber aesthetics with modern fire codes by prioritizing compartmentalization and rated assemblies? You’ll enhance interior lighting and exterior landscaping, executing safe detailing, discreet fire barriers, and compliant finishes while preserving the cottage’s timeless warmth.
What Maintenance Routine Preserves Timber Sheen Long-Term?
You preserve timber sheen by regular inspections, cleaning dust gently, and sealing micro-damages promptly. Use interior lighting to highlight grain, and refresh exterior painting every 5–7 years to deter UV wear and moisture, extending longevity.
Conclusion
You’ll finally admit it: timber-frame charm isn’t a museum piece—it’s a living, breathing system that hates sloppy updates. So you’ll modernize with discipline: budget, inspect, and insulate without turning the cottage into a plastic box. Envision this satire: you, juggling timbers like a tightrope walker, engineers nodding approvingly as you whisper, “Yes, moisture is my arch-nemesis,” and the house sighs in relief, finally warm, efficient, and charming enough to outlive your DIY optimism. Mission accomplished, with cunning restraint.
About the Author



